Select your language

Blog
Dive into the world of Marketing Automation:
Practical & helpful knowledge that makes your daily life with Marketing Automation easier!
Step-by-step instructions to your personalized newsletter

is a product of the Marketing Cloud. The Marketing Cloud is in turn a part of the Salesforce platform.
from email design to tracking your emails
Right message, right person, right time!
Design & send e-mail newsletter with Marketing Cloud
1. Starts with campaigns & reports
In Salesforce, you can assemble the lists of people you want to send e-mail. Then you can create, send & track your e-mails in the Marketing Cloud. Reports & Campaigns makes the communication between these two systems, Salesforce & Marketing Cloud, perfectly. The best way to do this is to first create reports & campaigns with the groups of people to whom the newsletter is sent. It's important to create not only reports, but also campaigns to make tracking work better afterwards. After all, you also want to be able to see different key metrics, e.g. how many e-mails were opened or what was clicked on.
When creating campaigns & reports it's important to keep the target group in mind. Data Extension or lists can be used to create data records with specific target groups that should each receive the same e-mails. With optimal target group segmentation, your company can send the right message to the right person at the right time. The amount of data is not important at the beginning of segmentation, but it's important that you start. The goal is to address individuals with targeted messages that are specific, relevant & current for them. This in turn can lead to better deliverability, higher click rates, higher conversion rates and lower unsubscriber rates.
2. Create Newsletter templates
You have a wonderful design in mind, how your e-mail newsletter should look like, but you don't have enough HTML & CSS knowledge to build it that way? No problem - in the Marketing Cloud you can build newsletter templates from other templates or create them by drag & drop. However, the basic newsletter structure will rarely changes each time, so it makes sense to create templates tailored to your company. For example, you can insert content such as logos, address or colors in the template. It's important here that the templates are adapted to the different e-mail clients.
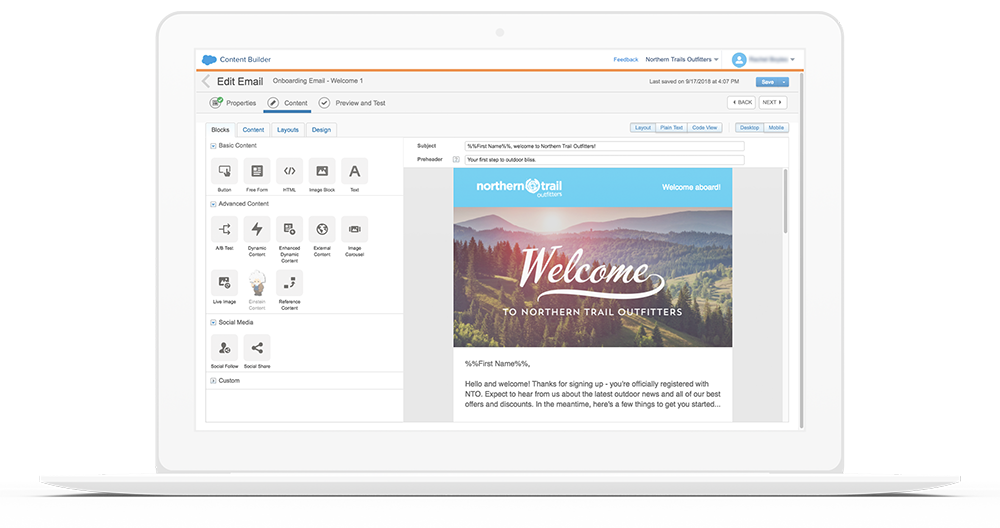
3. Content Builder within the E-Mail-Studio: Create Content
The Content Builder enables cross-channel content management. This allows you to bring together images, documents & content in your company in one central location. You can choose standard templates or previously created templates, exchange the different content blocks and adapt them to your current needs. How is it now possible to personalize & individualize individual content to the customer? In the Marketing Cloud there are various methods for this, such as personalization strings, dynamic content or the AMPscript language:
Example of a personalization string to automatically personalize the first name of the customer Nicole:
Personalization String: Dear %%FirstName%% - Thank you for your interest in our company!
Displayed is: Dear Nicole - Thank you for your interest in our company!
Example for Dynamic Content - Depending on the customer's interest, you can present other products in the newsletter:
For example, you are a company in the outdoor sector. Then you can display products such as fishing rods, rubber boots or other accessories to a customer who is mainly interested in fishing. For a family man, you can display a trampoline or footballs for his children, for example.
So: The e-mail is now created according to your ideas. Before sending a large e-mail campaign, you probably want to know how the e-mail will be received & look like. Of course this is also possible in the Marketing Cloud. You can either preview the e-mail, switching between the Desktop & Mobile view, or send the e-mail from the Marketing Cloud to your own address or to a test recipient. As soon as it's clear that everything fits, the e-mail is ready to be sent to the target group.
4. E-Mail-Studio: Sending the e-mails
Checklist in the e-mail newsletter transmission flow:
- Target group is according to certain criteria
- Content and design are coordinated across campaigns & channels
- Properties such as subject, preheader etc. are attractively defined
- Desired target group has been selected & groups of persons not to be addressed are excluded
- Delivery is configured, e.g. whether the e-mail should be sent directly or according to a schedule
- Preview for review and a test sending is made
5.Tracking in the E-Mail-Studio
With Marketing Cloud and these steps, you can create a ready-made newsletter to send from your design draft. Now the slogan "Right message, right person, right time! " nothing more stands in the way.
with Personalization Strings, Dynamic Content or AMPscript
Sources image & text content
- Image edit e-mail in Marketing Cloud
- Trailhead create and send targeted emails with Email Studio
- Book Online Marketing Ralf T. Kreutzer
Get your Marketing Automation news


powered by ![]()