powered by
![]()
Select your language

Blog
Dive into the world of Marketing Automation:
Practical & helpful knowledge that makes your daily life with Marketing Automation easier!
Preference Center with Marketing Cloud - Part 2

Preference Center with Marketing Cloud – Design and Layout
Some time ago we already had a look at how to build a Preference Center with Marketing Cloud and it's basic structure. Now we want to go the next step and implement a nice design with different assets.
Preparations
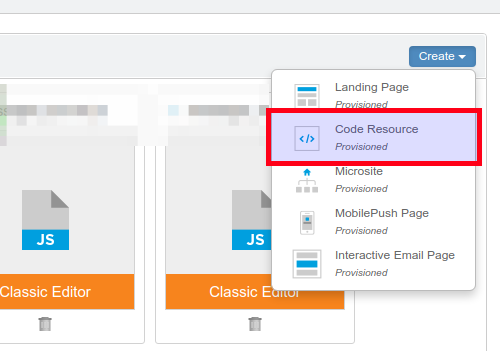
Create assets
For a nice design you'll need the assets, like images, scripts or stylesheets. You can upload those assets in Marketing Cloud next to the Cloud pages.
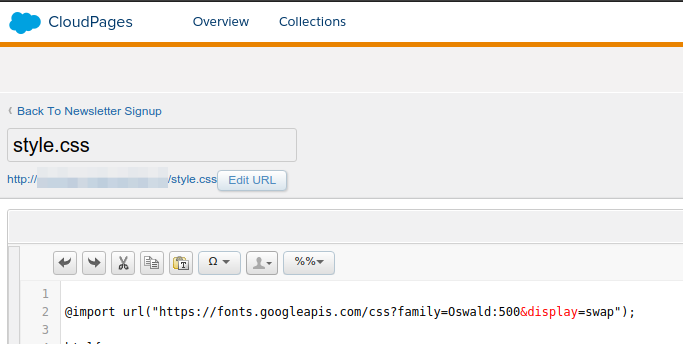
Prepare stylesheet
After that you can publish the stylesheet and use the URL to load it in the cloud page.
Tip: To simplify the development of an own layout you can use a frontend framework like Bootstrap. You can upload the stylesheet and other assets of it in Marketing Cloud too.
Upload images & co
Adjust Cloud page
<head> of your page:<link rel="stylesheet" href="[cloudpage.url]/[style].css">
Now you can add your CSS into your stylesheet file.
Tip: For a nice layout on mobile phones you may want to add the following meta tags into the <head>-area as well.
<meta name="viewport" content="width=device-width, initial-scale=1, shrink-to-fit=no">
And if you need to implement JavaScript, you can use the following snippet for your Cloud page.
<script src=".../assets/js/..."></script>
Bonus: Validation
Usually a preference center has multiple input fields. It would be nice to validate them. You can use simple HTML5-rules (e.g. required) or you use a JavaScript library. We suggest the usage of the jQuery validate library. This library is using HTML5-rules as well, but you can define the styling and add more complex rules.
You just need to add the script as an asset, add it into the HTML of your Cloud page and add the following validation snippet:
$("#myform").validate({
    submitHandler: function(form) {
        form.submit();
    }
});
This can look like this:

If you want to add more rules, e.g. checking if at least one checkbox of a group is selected, you can define your rules inside of the validate()-function. You find many examples of this in the jQuery validate documentation.
With a Preference Center, you have a suitable interface to manage your own subscription options for your subscribers. Are you thinking about how to implement a preference center in your company or would you like to learn more about the Marketing Cloud? Contact us so that we can discuss the structure and implementation together.
Quellen Bild & Textinhalt


powered by ![]()